Monday, December 17, 2012

suspect db in SQL 2008 R2

The Central Administration website of SharePoint 2010 suddenly stopped working giving a 404 HTTP error.

The following error was showing in the ULS logs

Wednesday, December 12, 2012

This website has been configured to disallow editing with SharePoint Designer (Project Server 2010)

When trying to edit a web part in the Business Intelligence site with SharePoint Designer, I got this error


This web site has been configured to disallow editing with SharePoint Designer.

To allow editing open this file on the SharePoint server C:\Program Files\Common Files\Microsoft Shared\Web Server Extensions\14\TEMPLATE\SiteTemplates\PWA\XML\ONET.XML and remove this part DisableWebDesignFeatures="wdfopensite" from the line <Project Title="Project Web App" Revision="2" ListDir="$Resources:core,lists_Folder;" SiteLogoUrl="/_layouts/inc/pwa/images/SiteIcon.png" xmlns:ows="Microsoft SharePoint" DisableWebDesignFeatures="wdfopensite" UIVersion="4">

Restart IIS and repeat for all other, if any, SharePoint Servers.

Tuesday, October 9, 2012

Adding SCOM 2012 Product Key

After I installed SCOM 2012 it was showing as Evaluation version. In order to add the product key you need to run a powershell cmdlet as described in the kb article http://support.microsoft.com/kb/2699998

To check the current license, open an Operations Manager Shell and run

Get-SCOMManagementGroup | ft skuforlicense, version, timeofexpiration –a

To register your product run

Set-SCOMLicense -ProductId "Product-Key-Here"


The license got updated after I restarted the server


SCOM 2012 single server deployment

This is a simple deployment of SCOM 2012 installing all roles on a single Windows 2008 R2 server. Microsoft reommends this type of deployment for evaluation and testing purposes.

First install dotnet framekwork 3.5, 4.0 and the Microsoft Report Viewer 2010 Redistributable Package. Then Install and configure IIS web role and SQL server

I have created an active directory group ScomAdmins with local admin rights to the SCOM servers and SQL sysadmin role. I also created the following service accounts.

User
Description
ScomAction
Management server action account – used to gather information and run responses on managed servers
SCOMSDK
System Center Configuration Service and System Center Data Access Service Account – used to update the Operations Manager Database. This account needs local admin rights to the SCOM server
SCOMRead
Used by the Reporting Services to run queries against the reporting data warehouse
SCOMWrite
Reads from the operational database and updates the reporting data warehouse


I log in with a member of the ScomAdmins group: ScomAdmin and launch SCOM 2012 setup


The setup will check next for prerequisistes, installing any missing ones and proceed

Type in the name of the Management Group and proceed. Previously in SCOM 2007 you could have only 1 root management server, SCOM 2012 allows the management server role to be assigned to multiple servers making it easier to acheive high availability.


Type in the name of the SQL server and wait for setup to verify, in my case it is the same server.

Setup will probe next for available Reporting Services installations. If there is a problem hover over the red X for details. Resolve any issues and proceed, in my case the SQL Server Agent service was not running so I started and set it to automatic from the SQL Server Configuration Manager.
Next, choose the web site and authentication mode for the web console
Fill in the service accounts created earlier in the active directory and proceed


SCOM 2012 is now installed. You should then import the management packs you need and discover the devices to manage.

Wednesday, October 3, 2012

Autochk cannot run due to an error caused by a recently installed software package. Windows 2008 R2

Windows 2008 R2 is reporting NTFS file system corruption that requires a chkdsk.
I schedule a disk check and reboot, but it fails with this error

Cannot open volume for direct access.
Autochk cannot run due to an error caused by a recently installed software package.
Use system restore feature from the control panel to restore the system to a point prior to the recent software package installation.
An unspecified error occurred (766f6C756d652e63 3f1).


I suspect the antivirus software was denying disk access, but I did not want to uninstall anything.
The safest thing to do with minimal changes seemed to run chkdsk from the Windows 2008 R2 DVD, so I boot from it, start a command prompt and run

chkdsk /f d:


chkdsk runs for a while and repairs some stuff. I reboot back into windows, the drive is OK and the file system errors are gone.

Thursday, September 27, 2012

Emptying the Recycle Bin for a specific user

Suppose you want to empty the recycle bin of a different user but you do not know his password and do not want to reset it or just do not want to login with his account for any reason.

First get the SID of this account, use PsGetSid from PsTools
Then put the SID in the script below and run it. (will not delete until you uncomment the delete lines)


Const strRecycle = "\\$Recycle.Bin\\" 'Windows 2008, for Win7 use: \\Recycler\\
Set objSWbemServices = GetObject _
    ("WinMgmts:Root\Cimv2")

Dim SIDs : SIDs = Array("S-1-5-21-4040636791-1997804162-1132720628-1008",_
   "S-1-5-21-4040636791-1997804162-1132720628-1014",_
   "S-1-5-21-4040636791-1997804162-1132720628-1018")


For Each sid In SIDs

    Set colDisks = objSWbemServices.ExecQuery _
        ("Select * From Win32_LogicalDisk " &  "Where DriveType = 3")

    For Each objDisk In colDisks
        Set colDeletedFiles = objSWbemServices.ExecQuery _
        ("Select * From Cim_DataFile Where Drive = '" _
        & objDisk.DeviceId _
        & "' And Path = '" & strRecycle & sid & "
\\' " _
        & "And Hidden = False")

        For Each objDeletedFile In colDeletedFiles
            WScript.Echo objDeletedFile.Name
            'objDeletedFile.Delete
        Next
       
        Set colDeletedFolders = objSWbemServices.ExecQuery _
        ("Select * From Win32_Directory Where Drive = '" _
        & objDisk.DeviceId _
        & "' And Path = '" & strRecycle & sid & "
\\' " _
        & "And Hidden = False")

        For Each objDeletedFolder In colDeletedFolders
            WScript.Echo objDeletedFolder.Name
            'objDeletedFolder.Delete
        Next

    Next
Next

Wednesday, September 26, 2012

Installing Windows Server 2012

So I received an evaluation DVD of Windows Server 2012 at the Microsoft Boot Camp event and finally got some time to try it out.
Windows Server 2012 has several enhancements to Hyper-V, failover clustering in addition to integration with Microsoft cloud services Windows Azure.

I created a new virtual machine in Hyper-V 2008 R2 and booted the iso image


Initially I got the following error, which turned out to be a corrupt image:

A media driver your computer needs is missing. This could be a DVD, USB or Hard disk driver. If you have a CD, DVD, or USB flash drive with the driver on it, please insert it now.

Note: If the installation media for Windows is in the DVD drive or on a USB drive, you can safely remove it for this step.


I got another good copy and proceeded

As you can see there is no Enterprise edition anymore. Windows Server 2012 comes in 2 editions both of which have the same features: Standard allows you to run 2 VMs and Data Center can run unlimited number of VMs.


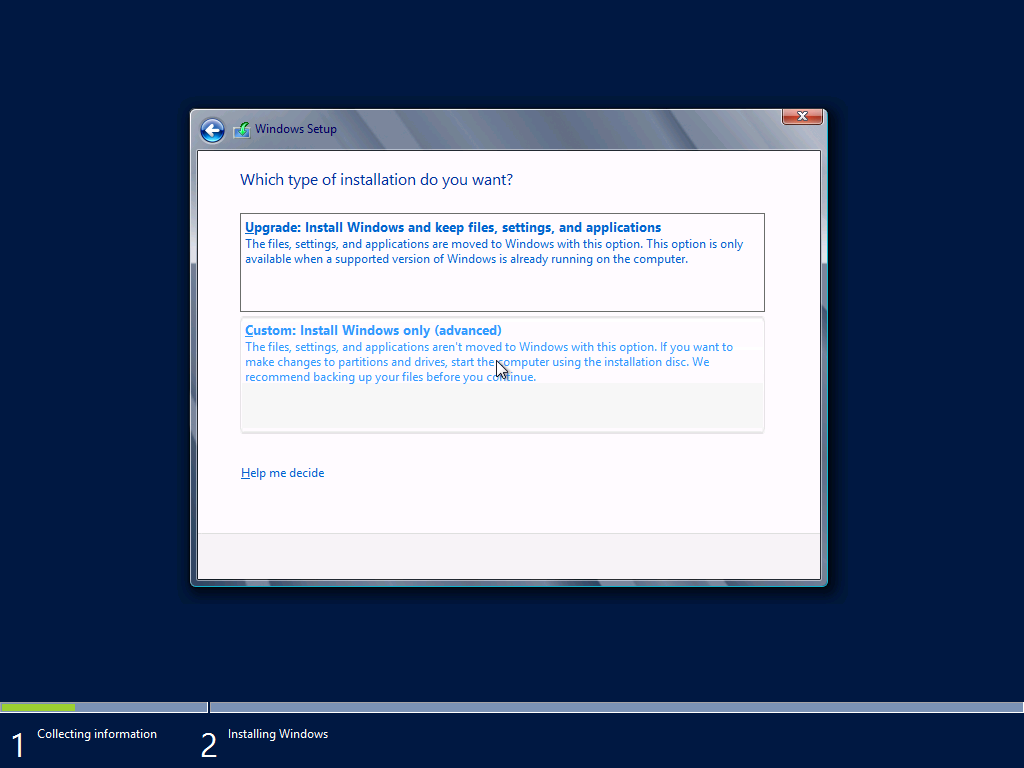
I choose to perform a new clean installation, select the disk drive and continue 


The installation goes on as usual, reboots a couple of times then prompts for the Administrator password


While you type the new Administrator password, you get an eye button that shows the password if you click hold it


Now the setup is complete and the login screen appears


After you login, the Server Manager pops up. The user interface is similar to the Windows 8 Desktop


This default installation is using around 12GB of disk space and 600MB of memory


Similarly to Windows 8, the Start Menu has been replaced with the Start Screen. If you hover the cursor over the lower-left corner for a while you will see Start Screen launcher, click it and you get the Metro-style tiled Start Screen, and of course you could have just pressed the Win key


Right click on any empty space, a bottom bar will appear with an icon "All apps", if you click it more applications tiles will appear

Right click any tile and the bottom bar will appear with more choices

Click on Desktop to return back to the desktop.
2 other hot spots at the top and bottom right corners, hovering over them shows the Charms Bar


Click on Settings, you will get another menu with other options such as shutdown and restart